Creating projects
Create projects to centralize your workpapers and communications. You may have up to 20,000 projects and older, completed projects can be backed up to maintain a history.
What is a project?
A project is a management system that allows you to define objectives, risks, and controls, perform tests, and compile information for reporting purposes. Projects may also be known as programs or engagements.
Notes
- Interface terms are customizable, and fields and tabs are configurable. In your instance of Diligent One, some terms, fields, and tabs may be different.
- If a required field is left blank, you will see a warning message: This field is required. Some custom fields may have default values.
How can I create a project?
You have three options for creating a project:
| Option | Useful if you want to: |
|---|---|
|
Start a new project
|
start a project from scratch |
|
Create a project from a project template
|
use a project template as a starting point for your project |
|
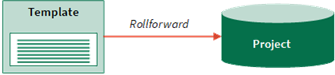
Rollforward a project
|
create a project from an existing active or archived project to copy and reuse planning and previously configure settings |


Tip
You can create a project as part of the assurance plan setup process. For more information, see Defining assurance plans.
What is the best option?
The best option to choose depends on your requirements and the availability of an existing active project, archived project, or template that matches your needs. You can always customize the project to coincide with the terminology and needs of your organization.
For more information, see Customizing terms, fields, and notifications.
Permissions
Only Project Admins and Project Creators can create projects. Professional Managers can rollforward projects they have access to.
Start a new project
Start a project from scratch.
Rich text fields cannot exceed 524,288 characters.
-
The Projects homepage opens.
- Select New > New Blank Project.
- In the New Project page, enter the following information:
Field Description Name Enter a descriptive name for the project.
The maximum length is 120 characters.
Description
optional
Specify any additional general information you want to record about the project. Project Type Select the appropriate project type from the dropdown list.
The labels and terminology used in Projects are dependent upon the project type that you select. For more information, see Workflows and project types.
Status Select the appropriate status to classify the project for workflow management or reporting purposes.
For more information, see Configuring project statuses.
Fieldwork Start Date Select the date your project is scheduled to begin. Target Completion Select the date your project is scheduled to be completed. Budgeted Hours
optional
Specify the total number of hours that have been allocated for the project. - If you select one of the project types under Internal Control Projects, complete the following fields:
- How many rounds of testing will be performed? – Select the option that corresponds to the number of testing rounds you want to perform.
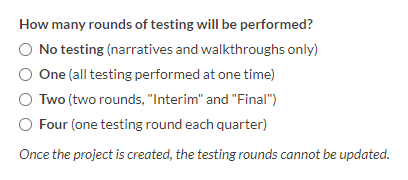 Note
NoteWhen you first create or rollforward a project, the number of testing rounds you choose becomes locked in. You can't change the number of testing rounds after saving the project.
- What is the maximum sample size for testing? – Enter the value to use as the maximum sample size.
The default value is 25.
- How many rounds of testing will be performed? – Select the option that corresponds to the number of testing rounds you want to perform.
- Click Save.
Result The new project is created.
Create a project from a project template
Use a project template as a starting point for your project. For more information about the available project templates, see Using project templates.
Rich text fields cannot exceed 524,288 characters.
-
The Projects homepage opens.
- Select New > New Project from Template.
- Click Use Template next to the template you want to create your new project from.
The Project Rollforward form opens.
- In the Project Rollforward form, modify the default values in any of the following fields, and click Rollforward.
Result The new project is created.
Field Description New Name Enter a descriptive name for the project.
The maximum length is 120 characters.
New Description
optional
Specify any additional general information you want to record about the project. Project Type Select the appropriate project type from the dropdown list.
The labels and terminology used in Projects are dependent upon the project type that you select. For more information, see Workflows and project types.
Status Select the appropriate status to classify the project for workflow management or reporting purposes.
For more information, see Configuring project statuses.
Fieldwork Start Date Select the date your project is scheduled to begin. Target Completion Select the date your project is scheduled to be completed. Budgeted Hours
optional
Specify the total number of hours that have been allocated for the project.
Rollforward an active project
Rollforward an existing active project to copy and reuse planning and previously configured settings to set up a similar project.
- Open Assurance Plans.
The Assurance plans page opens.
- Create a new assurance plan or navigate to an existing assurance plan.
- Click + Add to plan and click Rollforward project.
- Select the active project that you want to rollforward and add to the assurance plan, and click Continue.
- Provide basic information about the new project, and click Continue.
- Review and finalize the project, and click Save and rollforward project.
Result The new project is created and added to the assurance plan.
Rollforward an archived project
Rollforward an existing archived project to copy and reuse planning and previously configured settings to set up a similar project.
Rich text fields cannot exceed 524,288 characters.
-
The Projects homepage opens.
- Under Planning And Results, select Project Library.
The Project Library page opens.
- Click the overflow button
 , and click Rollforward.
The Project Rollforward form opens.
- In the Project Rollforward form, modify the default values in any of the following fields, if necessary:
Field Description Select an Organization Select the appropriate Diligent One instance to rollforward the project to.
To search for a Diligent One instance, enter a keyword in the search box. Results are automatically filtered as you type.
New Name Enter a descriptive name for the project.
The maximum length is 120 characters.
New Description
optional
Specify any additional general information you want to record about the project. Project Type Select the appropriate project type from the dropdown list.
The labels and terminology used in Projects are dependent upon the project type that you select. For more information, see Workflows and project types.
Status Select the appropriate status to classify the project for workflow management or reporting purposes.
For more information, see Configuring project statuses.
Fieldwork Start Date Select the date your project is scheduled to begin. Target Completion Select the date your project is scheduled to be completed. Budgeted Hours
optional
Specify the total number of hours that have been allocated for the project. - Optional. Include project results Select this option to include planning files, results fields and files, execute procedures / walkthroughs, tests, issues, actions, and latest versions of attachments in the project.
- Click Rollforward.
Result The new project is created.
Add multiple projects
For information about adding multiple projects at once, see Bulk importing projects.