Scheduling projects
Scheduler is an app in Diligent One. Use Scheduler to get a comprehensive view of all your projects and key milestone tasks, so you can easily visualize project obligations as you plan.
How it works
The Scheduler is an interactive Gantt chart that provides a convenient way to create projects, and manage timelines and dates associated with all active projects in a Diligent One instance.
The chart on the Projects tab of the Scheduler lists all of the scheduled projects on the y-axis, and time intervals on the x-axis. The width of the horizontal bars in the chart represent the duration of each project, phase, or individual task (planning file, objective, or results file).
Using the chart, you can quickly determine the risk of schedule slips, overlaps, and dependencies.
Dates
By default, the following fields are used to display the planned start and end dates of a project:
- Fieldwork Start Date
- Target Completion Date
To display additional dates in the chart, a Project Admin or Project Type Admin must enable one or more of the following date fields pertaining to planning files, objectives, and result files in the project type:
- planned start and end dates
- actual start and end dates
- planned and actual milestone dates
For more information, see Customizing terms, fields, and notifications.
Chart components
The following table describes each chart component. You can hover your mouse over each horizontal bar or circle in the chart to view detailed information.
| Chart component | Represents |
|---|---|
|
|
Planned dates for a project or task |
|
|
Actual dates for a project or task |
|
|
Planned milestone date for a project or task |
|
|
Actual milestone date for a project or task |
|
|
Roll-up of planned dates for a project or phase |
|
|
Roll-up of actual dates a project or phase |
|
|
Today's date The thick grey line is displayed in the Weeks chart view. The thin grey line is displayed in the Months, Quarters, and Fiscal years chart views. |
|
|
Today's date |
Projects, phases, and tasks
Each project can include multiple phases and tasks. A Project Admin or Project Type Admin must enable planned date fields for planning files, objectives, and results files in the project type to display phases and tasks in the chart.
Notes
- Interface terms are customizable, and fields and tabs are configurable. In your instance of Diligent One, some terms, fields, and tabs may be different.
- If a required field is left blank, you will see a warning message: This field is required. Some custom fields may have default values.
| Component | Description |
|---|---|
| Project | a planned undertaking that can include multiple phases, with each phase having zero or more tasks |
| Phase | a significant stage that is part of a project:
|
| Task |
a specific piece of work associated with a phase:
|
Example
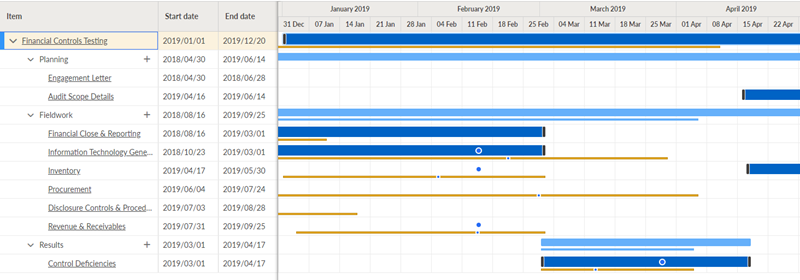
Managing project timelines and dates
Scenario
As an Audit Manager, you need to manage timelines and dates associated with the Financial Controls Testing project. Previously, you enabled the following date fields pertaining to planning files, objectives, and result files in the project type:
- planned start and end dates
- actual start and end dates
- planned and actual milestone dates
You also added a series of planning files, objectives, and a results file to the Financial Controls Testing project.
Process
You open the Scheduler, search for the Financial Controls Testing project, and specify the dates for the different tasks under each phase.
Result
The timelines and milestones for the Financial Controls Testing project are displayed as follows:
Permissions
Project Admins, Project Creators, and users assigned the Professional Manager, Professional User, or Oversight Executive role on at least one project can access the Scheduler.
Navigate to the Scheduler
Navigate to the area where you can manage project schedules.
Result The Projects tab of the Scheduler page opens and defaults to the Month view. The timeline start defaults to the current day of the previous month.
Create a project
From the Projects tab in the Scheduler, create a project from scratch or select a template as your starting point.
Choose one of the following options:
- To start a new project from scratch, select New > New Blank Project.
For more information, see Creating projects.
- To use a project template as a starting point for your project, select New > New Project from Template.
For more information, see Using project templates.
Result The project is added to the Scheduler. Projects are sorted by Fieldwork Start Date, and then by project name.
Filter projects
From the Projects tab in the Scheduler, you can restrict the list of projects that display in the chart. By default, only active projects display, but you can create your own custom views, which are visible to everyone in your organization.
- To apply or modify an existing view, choose a view from the dropdown list. By default, the Active projects only view is applied.
- To change the applied filters, click x filter(s) applied. The Saved view pane opens.
- If you want to modify an existing view, under Name, choose a view to modify.
- Filter your project list by users, project names, statuses, and tags. The project list updates as you apply filters.
- Choose to apply your filters without saving them, or save your changes to a new or existing view.
- To apply your filters without saving them, click the Close button in the upper-right corner of the Saved view pane. A note appears indicating that you have unsaved changes applied to your current view.
- If you have a saved view open, to update the view with your current filters, click Save.
- To save your filters as a new view, click Save view as. If you have a saved view open, click the ... button to access the Save view as option, or to rename or delete the current view.
Result The Scheduler app displays the projects that match your filters.
Add tasks
From the Projects tab in the Scheduler, add planning files, objectives, or results files to the appropriate phase in a project.
- Next to the appropriate project phase, click Add task
 .
.The side panel opens.
- Enter details about the planning file, objective, or results file.
For detailed information about fields, see the following topics:
- Planning files Planning projects
- Objectives Defining objectives
- Results files Concluding and maintaining projects
- Do one of the following:
- To save the task and return to the chart, click Save and close.
- To save the task and add another one, click Save and add another.
Result Planning files, objectives, and results files are first sorted by Planned Start Date, and then alphabetically under the appropriate phase.
Edit dates and descriptive details
From the Projects tab in the Scheduler, edit dates and descriptive details associated with projects and tasks.
Do any of the following:
- Edit project details click on a project name in the chart, update any fields, and click Save.
- Edit planning files, objectives, or results files click on the task in the chart, update any fields, and click Save.
- Lengthen or shorten a timeline click and drag the end points of the timeline to the appropriate place.
Changes are saved automatically.
- Shift timelines click and drag the timeline in the chart to the appropriate place.
Changes are saved automatically.
Note
Only project and planned timelines can be lengthened, shortened, or shifted. Timelines with actual dates can only be updated when you edit details for a project or phase from the side panel.
Customize the chart view
From the Projects tab in the Scheduler, customize the chart view to see project schedules and roll-up information.
Do any of the following:
- Filter the view and adjust the increments on the x-axis select one of the following options: Today, Week, Month, Quarter, or Fiscal year.
Note
The default fiscal year end date is December 31. System Admins can define their organization's fiscal year end date in Launchpad.
For more information, see Updating organization settings.
- Show or hide project roll-up switch on
 or off
  the toggle next to Show project roll-up.